In this article, I would like to show you guys how to import Virtualbox or VMware machines into `Proxmox visualization 5`. First of all, for this article, I am going to pick one of `Vulnhub's machines` which is `Breach2` by the awesome guy `@mrb3n` Find it at Link.
After downloading the VM machine, extract it and make sure it has OVA file. In my example, the file exists under name 'Breach-2_final2.1.ova'
yas3r@localhost:~/Downloads/Breach2$ ls -la
total 1343908
drwxr-xr-x  2 yas3r yas3r       4096 Jul 26 22:07 .
drwxr-xr-x 18 yas3r yas3r       4096 Jul 26 22:06 ..
-rw-r--r--  1 yas3r yas3r 1376143039 Jul 26 22:06 Breach-2_final2.1.zip
-rw-r--r--  1 yas3r yas3r          0 Jul 26 22:07 un-zip
yas3r@localhost:~/Downloads/Breach2$ unzip Breach-2_final2.1.zip
Archive:  Breach-2_final2.1.zip
  inflating: readme.txt
  inflating: Breach-2_final2.1.ova
yas3r@localhost:~/Downloads/Breach2$ ls -la
total 2714288
drwxr-xr-x  2 yas3r yas3r       4096 Jul 26 22:08 .
drwxr-xr-x 18 yas3r yas3r       4096 Jul 26 22:06 ..
-rw-r--r--  1 yas3r yas3r 1403264512 Aug 18  2016 Breach-2_final2.1.ova
-rw-r--r--  1 yas3r yas3r 1376143039 Jul 26 22:06 Breach-2_final2.1.zip
-rw-r--r--  1 yas3r yas3r       1138 Aug 19  2016 readme.txt
yas3r@localhost:~/Downloads/Breach2$
Next, we need to extract OVA file in order to get the disk image using GNU tar command as the following:
yas3r@localhost:~/Downloads/Breach2$ ls -l
total 2714288
-rw-r--r-- 1 yas3r yas3r 1403264512 Aug 18  2016 Breach-2_final2.1.ova
-rw-r--r-- 1 yas3r yas3r 1376143039 Jul 26 22:06 Breach-2_final2.1.zip
-rw-r--r-- 1 yas3r yas3r       1138 Aug 19  2016 readme.txt
yas3r@localhost:~/Downloads/Breach2$ tar xvf Breach-2_final2.1.ova
Breach-2 _final1.1.ovf
Breach-2 _final1.1.mf
Breach-2__final1.1-disk1.vmdk
yas3r@localhost:~/Downloads/Breach2$ ls -l
total 4084668
-rw-r--r-- 1 yas3r yas3r 1403255296 Aug 18  2016 Breach-2__final1.1-disk1.vmdk
-rw-r--r-- 1 yas3r yas3r        149 Aug 18  2016 Breach-2 _final1.1.mf
-rw-r--r-- 1 yas3r yas3r       6023 Aug 18  2016 Breach-2 _final1.1.ovf
-rw-r--r-- 1 yas3r yas3r 1403264512 Aug 18  2016 Breach-2_final2.1.ova
-rw-r--r-- 1 yas3r yas3r 1376143039 Jul 26 22:06 Breach-2_final2.1.zip
-rw-r--r-- 1 yas3r yas3r       1138 Aug 19  2016 readme.txt
Then, It's the time to copy the disk image to `Proxmox`. Use your favorite method to copy it. For me, I will be using `scp` command.
yas3r@localhost:~/Downloads/Breach2$ scp -i ~/pve_id_rsa.priv Breach-2__final1.1-disk1.vmdk root@pve:/root/Next, Login to Proxmox console, create a new Proxmox’s machine as the following:
root@pve:~# qm create 160 -net0 e1000,bridge=vmbr0 -name Breach2 -memory 1024 -bootdisk sata0Where `qm` is the main command to manage the virtual machines on `Proxmox`. The following option is `create` to create a new one, and the network card that connects to virtual connection `vmbr0`. Then, Setting the name and the amount of RAM to the machine. To make sure that we have successfully created it, execute the following command:
root@pve:~# qm list
      VMID NAME                 STATUS     MEM(MB)    BOOTDISK(GB) PID
       106 Noname               stopped    2048              32.00 0
       107 MailServer           stopped    1024               1.00 0
       108 Jail                 stopped    1024              32.00 0
       109 Firewall             stopped    1024              10.00 0
       `160 Breach2              stopped    1024               0.00 0`
       200 kali                 stopped    4096              32.00 0
       222 Win10                stopped    4096              25.00 0
       901 Router               stopped    1024               4.00 0
       999 Nineveh              stopped    1024               5.00 0
root@pve:~#
Now, We have to import the Breach's disk to the created machine which has id `160`
root@pve:~#
root@pve:~# qm importdisk 160 "Breach-2__final1.1-disk1.vmdk" local-lvm
  Using default stripesize 64.00 KiB.
  Logical volume "vm-160-disk-1" created.
    (100.00/100%)
root@pve:~#
So, we have imported the disk into the machine that has ID=160 using `importdisk` option.
Finally, login to Promxmox's control panel or you can also do it using the console, but for this article, I will show using the control panel.
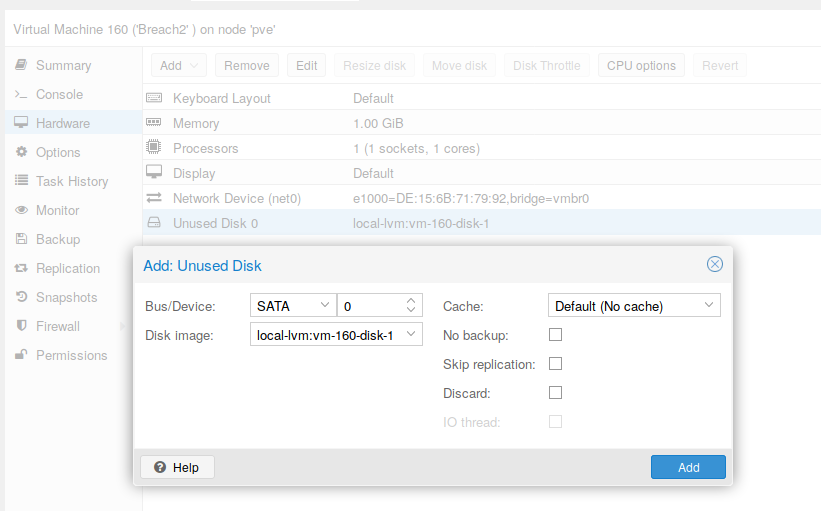
Click on the created machine `Breach2` from the virtual machine's menu, and select the hardware option. Select `Unused Disk0` and make sure that the device is `SATA` and select `Add`.